Thursday 27 February 2014

Spliced Yew at 30"

The horn nocks are done and I've adjusted the tiller a bit more. The shape is pretty good now, there is always room for a little tweaking, but I'll get it shot in now. I've made a string so I shall be shooting some arrows through it today then fiddling and fettling with the horn nocks grip, arrow pass etc.
The guy I'm making it for tells me he uses black arrows with black fletchings so I though I'd go for a black leather grip and Mother of Pearl arrow plate for contrast.
There is still plenty of sanding etc to do, but I think it will be a very handsome bow. The question will then be how fast is it?
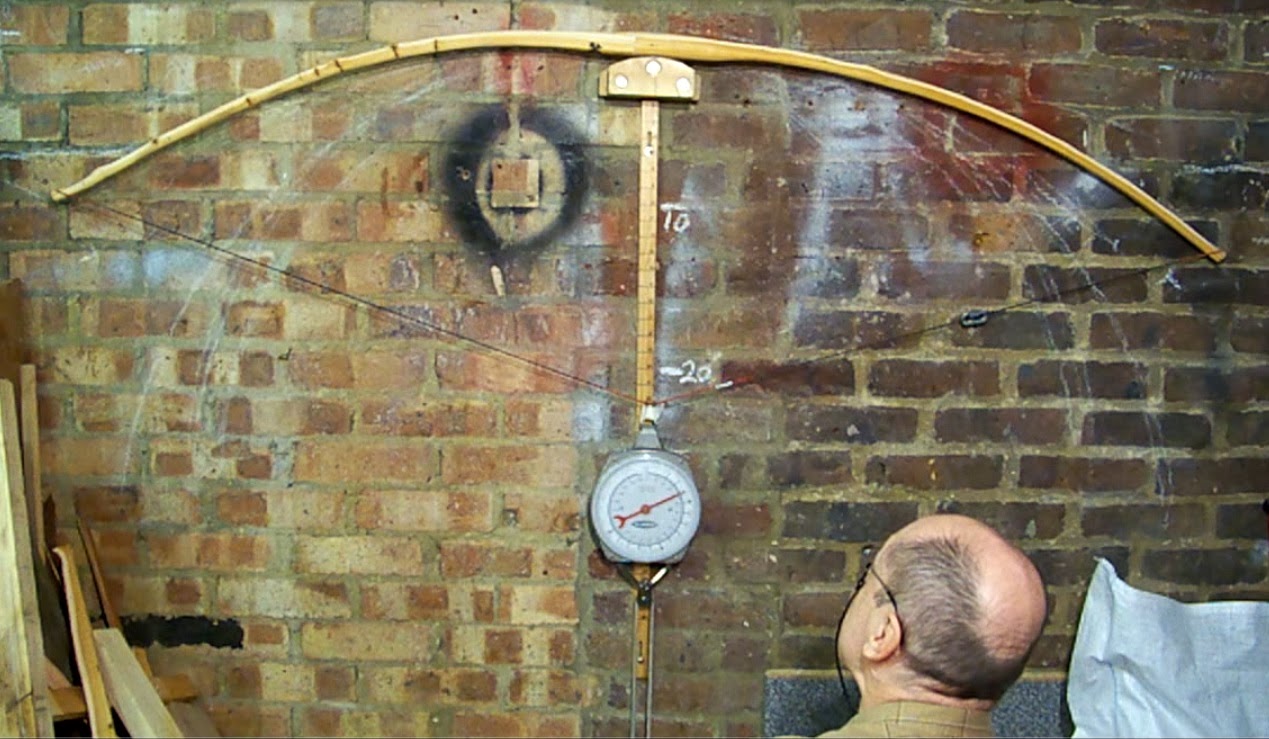
This pic is grabbed from video. The left limb bends more on the inner third than the right. If I do anything it will be to ease off the right limb near the grip, I may well leave it well alone for fear of dropping draw weight. It's between 40 and 45# at 30" at the moment.
Update:-
I've made the string and shot 4 arrows from a full 28" draw using my 'standard arrows' they hit clean true and fast. At 28" draw it must be below 40# yet it felt about the same as my regular bow 'Twister' (47#).
My longer arrows are a bit heavy for it but they shoot very  smoothly.
I have some arrows with the points broken off, I'll splice on new ends and make 'em up to suit a 30" draw, then I'll see how I get on at a longer draw, dunno if I'll be accurate enough at 30" draw to shoot through the chrono'. I'll try to get some figures. She certainly shoots nicely, back to the fiddling and fettling.

I've done some drawing of ellipses over the full draw pic. Due to the stiff grip section a single ellipse doesn't fit very well, but if we draw an ellipse for each limb with the centres on the ends of the grip it shows a good fit, quite what this means who knows! But it's a good way to show up any real missmatch in limbs.

Monday 24 February 2014

Tiller Much Improved

This pic is taken first thing this morning, so that I can review where I am.
It's pretty much there, and you can see the improvement from start of play yesterday.
It's now at a correct brace height and you can see it's pulling 45# at 29"
The tiller isn't perfect but it's close and the final bits of tidying up should improve it that last little bit.
The left limb looks a tad stiff at the end and a tad too much bend on the inner. This is due to the unbraced shape. It's taken a little set in the inner limb due to the early weak point and the out looks stiff as there is still a hint of recurve. Effectively that left (lower limb has a slight deflex reflex shape, but overall is now effectively straight. E.G the two tips of the bow and the grip are pretty much in line.
The right limb could still work more in the outer 1/3.
I shall fit horn nocks now, maybe losing just a whisker off the tips, that is to say I'll aim to get the string grooves say a half inch or so inboard from where they are now. That will help to avoid dropping any weight, as it's V close to where I want to be and I want to allow a little for the final scraping sanding tip narrowing etc.
Update:- I've got the top nock done and couldn't resist giving it a quick buff up to show it off with one of the nice features near the tip. Whoops, just realised, that's the bottom nock! Doesn't matter, it will just get rounded off a bit more for the traditional stubbier bottom nock.

Sunday 23 February 2014

Spliced Bow Early Tiller

I've been panicking a bit. The jump from making a 100# bow to making a 40-45# is HUGE and they feel so totally different.
I was feeling that I was running out of wood and it was flopping around like bit of wet spaghetti. My tiller rig gives a 2:1 advantage when pulling the rope which adds to the illusion.
On the plus side, the second heat treatment has done the job and I've got the limb alignment nice now. The tiller was horrible and I've been working hard to even it up. One problem is the wood isn't from matched billets and the the left limb has more sapwood, not to mention the recurve which makes the outer of the left limb appear extra stiff.
The left limb had a weak point on the inner third, not quite a hinge, but enough to make me sweat. I should really have taken a picture, but I wasn't going to let it sit there with the weak area under pressure.
Anyhow I'm slowly reducing the asymmetry, but it's still plain to see. In the picture it's on a low brace at 40# and 21". You can see I have some draw length to play with still, so hopefully it should get there. I also have a reasonable length of bow so I can always loose an inch of each end if I need an extra whisker of draw weight (no that an inch of each end will gain much).
Basically it's a matter of working down the whole right limb and the outer half of the left.
Now the string line is better I can exercise the bow and start to reduce the width near the tips, that will help to get them moving . Note the pic is low res' as it is grabbed from video.
Update:- I've spent another half hour on it and the tiller is looking better, it's also feeling like a bow as I've drawn it as an actual bow rather than on the tiller to prob' about 25"

Saturday 22 February 2014

The Wisdom of Waiting

I've had the spliced Yew bow on the tiller and it was pulling back ok. The cracking sound of the cambium popping off the right limb was a tad disconcerting as for a moment I thought it was the glue of the splice giving way!
The reflexed limb has been trying to bend sideways big time and seems a tad softer than the upper limb. I've adjusted the tips to try and correct the string line, but there isn't much spare width left.
Plan B! I'm heat treating the belly and straightening that limb simultaneously. It should toughen the belly and hopefully make the limb stiffer so it matches the the other limb better. It should help stop the sideways bend by fully correcting the string line. I'm also taking a hint of reflex out of it to make the tillering easier.
I checked it this morning and it needs a bit more shift to get it right so I've clamped it up and given it another burst of heat treatment.


While that's cooling off overnight I've taken a pic of the Yew repair bow at 28" draw, both limbs look a tad stiff in the outer half to me, it's fairly subtle, but bear in mind it gets drawn to 31". I didn't want to hold it at 31 on the tiller and risk over stressing it.
The left limb looks to have a more full bellied curve and isn't so bad.
I've been asked to re-tiller it if I feel it is needed.
I'll ease off that left limb outer just a whisker and do a tad more on the right, hopefully it should make it shoot a bit sweeter, the draw weight may drop a pound or two, but it should loose some outer limb weight and may well shoot just as fast. Basically I'll just be extending that blend into the nock which I showed in one of the previous posts. I'l take it back to about mid limb, just taking the corners off the belly, as the bow is very square in cross section. Were I really going mad, I'd maybe heat treat the belly of the inner limbs to remove the set and heat temper the wood like I did on the 'Hickory Challenge' bow.
I won't do that though as it may over stress the bow and I also don't want to scorch the leather grip.
Always good to take a 'before' pic for comparison. The unstrung pic shows where the bow has taken it's set, I'll let you draw your own conclusions.

Thursday 20 February 2014

Repair Finished and Spliced Bow Quandry


I've got the back patch on the Yew bow repair done. I've strung the bow and drawn it and it all looks fine, were it my bow I'd tweak the tiller a bit as the upper limb looks a bit stiff in the outer third, but this is just a repair not a new bow and I've already done some extra work tarting up the tips and nocks which look much better now. I'll shoot it a bit just to check the patch next time I have my backstop netting and target set out.
I've included a picture of the fettled top nock, you can see I've flared out the groove a bit and removed some of the bulk

Meanwhile I've added a chunk of Yew to the belly of the spliced Yew bow in the handle area, this may well virtually disappear as the bow is tillered, but I felt it would give some extra support to the splice during early tillering. The big issue with the bow is the reflex on one limb.
How to proceed?
1. Tiller it as is, respecting the unbraced shape, so that limb will always look a tad stiff.
2. Use heat to remove some of the reflex, well that seems daft as a bit of reflex is a good thing, even if it pulls out during tillering. It helps to give a good early height draw weight and maximises stored energy giving a fast bow.
3. Use heat to add some reflex to the other limb, this will make it more symmetrical and easier to tiller and give a faster bow.
4. Tiller it to a low brace height and then do number 3. This has the advantage of getting a feel for how the limbs are behaving, after all the two bits of Yew aren't from the same tree, so I can't be sure how they will perform. It also has the advantage that the limb will be slimmer and need the heat applied for less time to allow it to bend. Doing nothing, wait and see, is often the way forward.

Monday 17 February 2014

Back Patch and Tip Tidy

I'm doing a repair on a bow. It had some damage to the back, a splinter lifting between two pin knots. While I'm at it I'll tidy up the  tips where the horn nocks are fitted.
The bow is a Yew longbow brought of the internet, its a good workhorse and belongs to the guy for whom I made the Derbyshire Yew 100 pounder.
It grieves me hugely that people taper the tips for horn nocks with all the subtlety of using a pencil sharpener.
I'll tart up the actual horn later on, although it looks less bulbous having tidied up the wood.
I'll let you judge for yourselves. I spent less than 5 minutes with my cabinet rasp (including taking the pics) here are the before and after pics.
It's not just cosmetic of course, the wood removed from the tips will add to the speed of the bow, not a lot, but it all helps. I could probably narrow the tips even further, but this is just a tidy up, rather than trying to 'race tune' the bow.

Here's a few pics of the preparation for the back patch too. The Yew shows some of that discolouration which I've been discussing in some recent posts. The bow has a fair amount of set, but, as I said it's a bit of a workhorse, the Derbyshire Yew bow being saved for 'best'!
The bottom pic shows how I had to make two patches before I got a good fit. All down to attention to detail again.

While I'm moaning about nocks, here's a pic to illustrate how the string groove is ok at brace but no good at full draw. The string will be pulling over a sharp edge while it's at it's greatest tension... not good, again just a few minutes with a file would sort it out!


Saturday 15 February 2014

Splicing Yew Billets

I've been asked to make a 40-45# 31" draw longbow which makes a bit of a change as I've been doing warbows lately. I have some billets from 2012 which aren't hefty enough for a warbow but they should be fine for this bow.
The problem with splicing billets is they are rarely perfectly even, so the back surface of each billet doesn't align nicely (see red arrows on top pic). The front edge of the splice is low. The back edge was high but has been rasped down exposing a little heartwood.. To over come this I'm rasping the back to a flat, concave, even surface and then overlaying a curved slice of sapwood (from the same wood as one of the billets). This has the added advantage of strengthening the back at the splice. I've used this technique before when I had a splice fail and I feel it's a sound belt and braces solution where splices are done on rather skinny wood.
The pictures pretty much tell the story, and you can see the quality of the splice where it has been rasped down, there are no gaps or excessive glue line. Note in the bottom left pic the pencil mark for alignment of the back overlay when I glue it down. I apply the glue, secure it in position with masking tape, then bind it with a couple of layers of rubber strapping to hold it tight while the glue cures. I use Resintite glue.

You can see in one of the pics, the right hand billet isn't as thick as the left. I may add a belly patch in the grip area, this will be tillered more Victorian style rather than Warbow style, so some extra thickness at the grip will look right.
The sapwood is just about the right thickness on the left limb and I'm hoping to be able to leave the back of the bow in it's natural state, by just carefully removing the bark. This may not be possible on the right limb which has slightly thicker sapwood. Once again this is the difference between theory and practice. In theory you have two perfectly matched billets split from the same large diameter Yew trunk with 3/16" of sapwood and evenly curved backs..... yeah in my dreams.
Although oddly, in my dreams I never actually get to cut the Yew, I'm always searching for some tree which I can't find!

Friday 14 February 2014

Rot or Not?

I got an E-mail from one of my friends, who having read my previous entry pointed out that not all discolouration is rot. It shows we are all still learning.
Some is chemical staining due to extractives, there are also wood staining fungi as well as wood rotting fungi, not to mention yeasts etc. I found some interesting articles by searching for discolouration of wood etc.
Anyhow, the proof of the pudding is in the eating so we'll see how the bow turns out.

Ah, well. I'd been hoping it would turn into a Character Primitive to be called 'Scarface' due to the huge scar mid way along the upper limb, where some sapwood damage seems to have promoted the change into extra heartwood. (1/4 way in from the right, lower edge on the second pic).
You can see for yourself the result. It wasn't far off tillered. Interestingly, it wasn't that area which gave way.
It's very hard to draw good conclusions from a break.
It would be tempting to look at the top pic and say that line of discolouration gave way, effectively de-laminating. Conversely the second picture could indicate I got it bending too much in the handle and the two pin knots were the weak point. (The handle is on the extreme left, you can just see the slight narrowing and some remaining bandsaw marks).
Without a stupidly expensive highspeed camera and flood lights it's impossible to see the break propagating. The simple answer is often the right one (Occam's Razor)
This bow was always likely to be a triumph of optimism over common sense, but it's good to strive to push the boundaries.
I'm now very happy with my decision to saw this slice from the bigger warbow stave. Bit of a shame as it hadn't taken any set and felt pretty lively.
I'm just pleased I didn't spend too much time on it.

I like to get the most from any breakage, so I took the opportunity to cut a cross section from the unbroken lower limb just to see how it looked.


Monday 10 February 2014

Ups and Downs Yew & Osage


First the good news. I ran the best stave of rotten sapwood yew through the bandsaw to give a rather nice stave of heartwood which will do for a Hickory backed roving/flight longbow for me. Say 80# at 31" . I have a nice thickish Hickory lamination which will be just the job for a faily heay bow, It was given to me by one of my bowyer contacts as a swap/thank you for some stuff (Thanks Matt!).

The off cut was sapwood with a thin strip of heartwood on the belly, I flexed it to see if it would snap... hmmm it seemed surprisingly strong.
Now only an idiot would try to make a bow out of a bit of Yew with rotten sapwood, so I set to!
It's really an exercise in discovering what the wood will do and how deep and deadly the rot is. It will be a simple flat primitive style bow, I'm not going to spend an age on it. I drew along the couple of big splits and fitted a bow between 'em and roughed it out quickly on the bandsaw. I'll tiller it mostly from the sapwood side as there is little heart wood to play with. You ca see from the pics the parlous state of the sapwood, yet it feels firm and creamy under the spokeshave!


Damn, I've been beaten by a bit of Osage! I was making a short Native American style bow, I'd chased a ring down the back and it was beginning to look promising, then some splits became apparent between two rings and by the time I'd removed enough wood to get rid of 'em there was virtually no bow left. I played with it, but it was about 20# with a nastly weak spot. I even tried a little belly patch, but Osage doesn't take glue too well (despite my attempts at de-greasing it with some lye (sodium hydroxide drain cleaner) ).
The Osage was the worst quarter of a half log which I'd split in two (given to me by a friend from the club). Lesson learned, I'm cleaning up the other half, and will inspect it more carefully for splits before trying again.
I'd spent a good few hours chasing a ring on that damn Osage...
Yeah so, remind me again 'How long does it take to make a bow?' the ever present question. Well it's all these failures that contribute to the necessary experience and prevent a simple answer.

I was in danger of getting into overthink and bow overload with too many things going on at once so.
The Osage bow has been scrapped. The rest of the log cleaned up a bit and set aside. The Yew heartwood is roughed out, set aside and waiting for a Hickory back. I'm going to press on playing with the rotten sapwood bow as it's just for the sheer fun/daftness of it, and sometimes, just occasionally these mad experiments can yield a superb character bow.
I've also got someone wanting a 40-45# longbow at 31" which is a nice change. I'm short of Warbow sized staves and billets, but I think I have a couple of billets that will make him a nice bow.
Better to be busy than bored I always think!

Saturday 8 February 2014

comme ci comme ça

Mixed fortunes yesterday, I went to visit a local tree surgeon who had some Yew. He was a nice bloke and a good contact. The Yew had been in a log pile with a torn tarpaulin over it for about 7 years. There looked to be a couple of bows in there but the bark was wet and falling off, not a good sign.
Anyway I loaded up up the roof rack and gave him a hefty 'drink' (I don't know if that expression travels outside the UK... it just means some cash... as in 'buy yourself a drink')
I spent the rest of the day tackling the wood. The best bit was too big to get through the bandsaw, and the knotty side was too bad to risk splitting. That's to say the split would wander round the big knots and could go anywhere. The trick was to saw half way through the log every 10" or so and then use an axe and wedges to split off that section.... yes, that's hard work! (see pic right).
Eventually I reduced it to half a log, fairly clean and straight. I roughed it out on the bandsaw to approximate warbow dimensions, but could see a blue/grey line between heart and sapwood (see first pic, a bit of well seasoned Yew below a sliver of the stuff with rot in it). Not good, mind I've seen Yew bows that people have bought on line from Eastern Europe with that sort of rot starting to set in, and indeed on the last bow I did there was a hint of it at one end which I sawed off.
Ever the optimist I pressed on and took off a wafer thin scrape of sapwood which was discoloured, it revealed a clean creamy colour, but with threads of black rot meandering through it and also some splits... damn.
Never mind, all is not lost, I have a nice slat/lamination of Hickory which one of my bowyer buddies gave me and I've been hankering to do a Hickory backed Yew flight longbow for myself. Another mate wants a Bamboo baked Yew longbow.

This shows the ups and downs of sourcing Yew, and the work that gets put in. It goes to show that those rather expensive staves online are maybe not as expensive as one might think, of course they are still very much a case of Caveat Emptor (buyer beware) as you can't really tell what a stave is like until you start working it. I think the stave for the last bow I did was an exceptional E-bay purchase by the guy who commissioned the bow and was certainly value for money.
The day left me tired, hungry and a tad down. This morning I've perked up and I know I'll get at least one bow and maybe a primitive or two from the smaller pieces. My big Sis will also get some hard won firewood! The good thing is I've made another local contact for future Yew.

Meanwhile back to the bows, I've started work on an Osage short Native American bow, modelled roughly on the bow (B) on p52 of The Traditional Bowyers Bible Vol 2.  This is for a friend from the club who gave me the Osage log for a V small drink and the promise of a bow. The log was split in two ages ago an will give us each a bow.

Thursday 6 February 2014

Cameras Videos and Stuff

One problem with digital cameras is the delay between pressing the button and it taking the picture. This makes it very difficult to get a good full draw shot (except in the unlikely event of you wanting to take a pic of a compound or recurve archer who will often hold at full draw for ages). There are fancy expensive cameras which get round this, but I was looking out for some thing cheap that I could take out and about without too much worry if I drop it in puddle or lost it.
I'd been scouring the internet and came across the Kodak ZX1 a pocket camcorder that films in HD at 30 frames per second (fps) as usual, but also films HD at 60 fps. The optics on the camera are pretty rudimentary with a tiny lens like a pin hole, but they are cheap as chips. I brought one off E-bay ony £22 including postage. Note, Kodak no longer do digital cameras so there could be some bargains about.
I got it last night and tried it indoors, the pics were a bit grainy and I tried it in the garage trying to video a bow on the tiller. Unfortunately the optics wouldn't take in the whole length of the bow... hmmm I was a bit dissapointed. Mind at twenty quid I'd got a 16Gbyte memory card and rechargeable batteries that fit my rugular camera (also Kodak) so It was a no lose scenario.


This morning I tried it out in daylight filming myself shooting a few arrows... Bingo! Filming at 60 fps in HD meant I could grab stills off the video at better resolution than with the regular camera. It also slows down nicely even down to 0.125 times speed and it looks smooth. Of course if I down load the video to the blog it gets compressed to hell and still looks rough which is irritating but I'll try a tiny clip of 0.25 speed to see if its any better than the usual. Here's a couple of stills grabbed from video and the clip.
The still shows my relaxed draw is much shorter than I thought. OK it still doesn't stop the arrow in mid flight but it's better than my usual camera. On the uncompressed video I can see I tend to come up slightly above target then drop onto it and ease off maybe an inch of draw.
Whilst not real slo-mo, the camera does offer some improvement on my regular one. I'm toying with the idea of making a mounting so it hcan be a head cam to see if I can capture the feel of field shooting. It will also be handy for family occasions and assorted other stuff. Overall I'm V happy with my twenty two quids worth.

I also had a visit from the chap collecting the Darbyshire Yew bow, he was very pleased with it. We had a good old chat and he brought me one of his other bows for a bit of remedial work. I don't usually work on other bowyers bows, but I was happy enough to have a look at it for him and hopefully give the bow a new lease of life. Shame the weather is so wet at the moment as this means it may be a while before I hear how he gets on with the bow.

Monday 3 February 2014

Arrow Plate

I've done a Mother of Pearl arrow plate, I've made it long and slim, as I've noticed on heavy bows the wear marks can be rather spread about. I've kept it fairly narrow, hopefully in proportion with the bow.
The bow just needs a couple of wipes with Danish oil every day for a few days, then signing with my initials or bowyer's mark and draw weight/length/date. Then a final coat of beeswax polish and she's good to go.
Some people add brace height, string length etc which gets a bit cluttered with so much writing. Sometimes I'll leave a bow with no markings at all if requested.
This one is so nice I want my mark on it somewhere!

I really need to make myself a full draw bow, probably about 85-90 would suit me, I just can't keep the fitness levels up to shoot anything much heavier, and I was a bit disappointed to be unable to shoot this one.
I'm ok getting in training for a few weeks, then I forget and the fitness drops back to my normal level. I expect we all prabably suffer from the same trouble.

The pic is quite good, I had to fiddle around for a bit, and in the end used the flash. I've posted it V large, so it's roughly full size an the average computer screen.
You can just see a nice line of tiny pin knots at the top of the pic and a bit of a bulge below the arrow pass. I had to round that off a bit so it didn't make the grip uncomfortable.It's tricky to photograh shiny things without a decent lighting set up.

Just for future reference the bow string is an endless loop type, 12 strands of Astroflite 80.5" long.

Sunday 2 February 2014

Derbyshire Yew Full Workout

I took the bow up the club, and let The Stig my mate JT loose with it. He loved it and shot further with an EWBS Standard arrow than he's has ever done before with any bow.
His impression was that, in the early draw it nearer 120# and that I was just teasing him by saying it was 100# ! As the draw progressed he found it sweet as a nut. Maybe the extra length adds smoothness?
He shot a variety of arrows, culminating with some which had a 33" shaft, These went right out to the edge of the field, about 235 yards, they were burried an impressive distance into the mud too.
I'd been hoping he'd give it a full work out, so was pleased to see it given a full length draw. I tried a couple of shots myself, the first was using an arrow of mine without a horn nock reinforcement... the arrow disintegrated and scared the crap out of me.
No harm done to the bow, and I then used JT's arrows, but couldn't really do it justice, despite having shot round 18 field targets with a 50# longbow to warm up.
It probably only had a dozen shots in total, but it was at a real full draw, so that's as 'shot in' as I'm going to manage.
I'll study the video and pictures before maybe doing some final tweaks and fitting an arrow plate.
Note:- in the first pic the lower tip of the bow is obscured by JT's knee which makes the lower limb look rather odd. I've since had the bow back on the tiller and given it a few scrapes here and there. The draw weight has settled to 95# at 31" which is pretty much what was required.

Saturday 1 February 2014

Derbyshire Yew 100# at 31"

I've been tidying up the garage. The poor lighting by the tiller rig was irritating me and whilst tidying i found the old kitchen triple spot light which had one end cracked. Ha! A bit of work sawing one end off and drilling a new mounting point and presto, improved lighting. All was well until I opened the up and over garage door... whoops, it neatly sheared off the top lamp. Fortunately there were enough bits from the original fitting to mend it. Once lowered a few inches it worked fine.

The bow has had a tiny bit of work here and there, mostly near the tips and the 100# mark has now inched back to a whisker over 31".
The curve is looking better, it may have a tiny bit more done about 3/4 of the way down the lower (left) limb, and maybe the first 1/4 but I'll probably leave that until its had some more arrows through it tomorrow, to let it settle.

I've made some bow wax too.
One of my on-line friends told me that beeswax and vegetable oil (Olive or Canola) in a ratio of 6:1 works well. In the UK Canola is usually called Rape seed oil and I had some of that (a little cheaper than the fancy Olive oil). I cleaned out an old aluminium saucepan that was lying around in the garage (we went over to stainless steel ones a while back, so I had all the old ones for man's stuff) and warmed up some oil with a block of beeswax in it. Pretty soonit dissolved, there seemed to be rather a lot of oil (I'd weighed it out) so I lobbed in another block of beeswax. Once that had dissolved I poured it into a nice old square pickle jar left over from some fancy Christmas pickle. It set to a slightly too hard consistency, it has a nice neutral smell and works as a good lip balm too. Maybe I'll warm the jar in a pan of hot water and add a bit more oil to it. I'm amazed how the beeswax seems to have just soaked up the oil.
It's cheaper than the commercial stuff, but that's not really the point as I don't use a huge amount. The good thing is it allows you to adjust the consistency to suit your needs and it's handy for applying to leather or the 4mm hemp rope I use as a warbow stringer. The rope looks and feel much better for a wipe of wax.
I've just messed about with 'MS Paint' to look at the curve of the bow. It looks like the tiller is somewhat more eliptical than my usual arc of a circle. I think perhaps I was wary of getting it bending in the centre section too much too early. This may help guide how I make any small final tiller djustments as I do like a nice full arc of a circle on a Warbow, although a little elipse is prob a good thing. The centre of the elipse is slightly left of the bow's geometric centre, I'll also take that into account.