Monday 31 March 2014

Drat! Lost Some Weight

Damn, I did exactly what I was worried about, I took the tillering V carefully for fear of over-stressing the top limb, but I've ended up very much where it was at the end of the shooting with the lower limb looking a whisker weak and the draw weight down to 75# at 33".
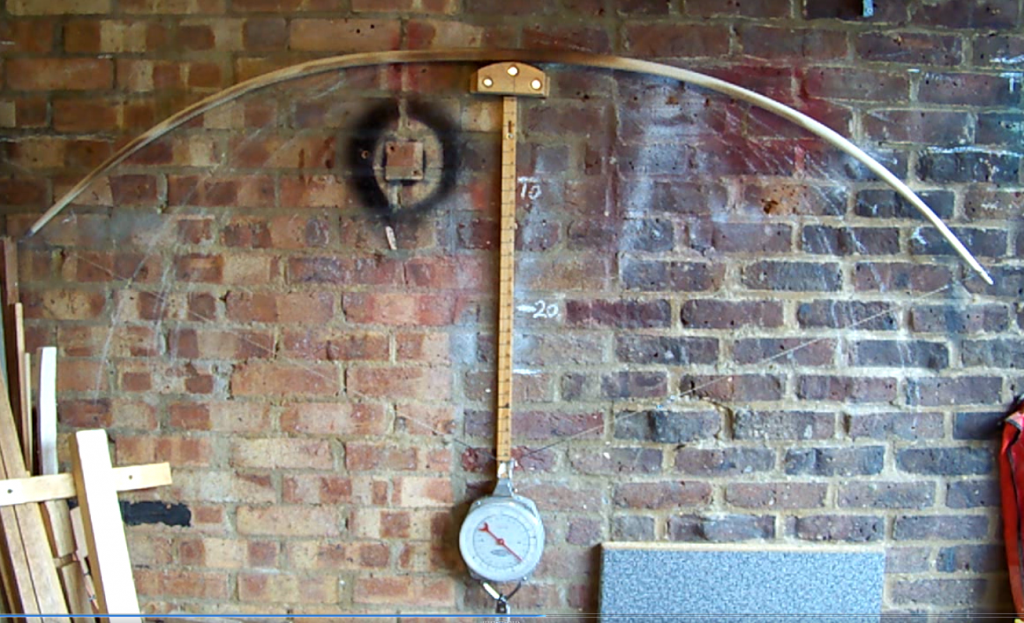
Yet when I looked at the video it seemed to show 85#... it turned out I was looking at the original video in mistake for the latest one. So I set the camera closer and took some more video. Pretty unambiguous.

I could theoretically take an inch or two off the lower limb and replace the nock, but frankly my dear, I've had a bit of a belly full with this one. It's been a good learning exercise and the long belly patch is (I think ) a great success.
Maybe I'm too hard on myself, the odd few pounds is neither here nor there.. the bow is what it is and will probably take another inch of draw. If I shorten it, it will prob' chrysal again.
Think I'll quit while I'm ahead.
Ha! You know me by now... I just can't walk away, but how can I try out shortening the bow without a load of work and making a new string?
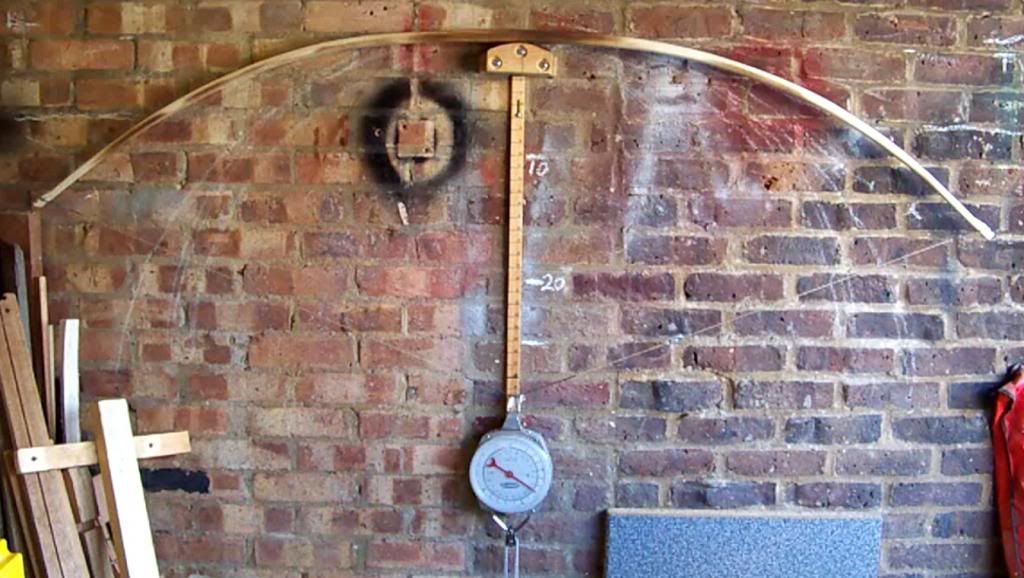
See pic!
I've effectively shortened it by 1 3/4" by wrapping with masking tape for grip and protection then binding down the string with linen thread..
The weight has gained a couple of pounds and the tiller looks better. I think I may lop 2" off and re-nock it. I might wait and see what Dave thinks!
Nah, I've just sawn 2" off it :-) ... watch out for updates.
Drat, I'll have to make a new string now :-(
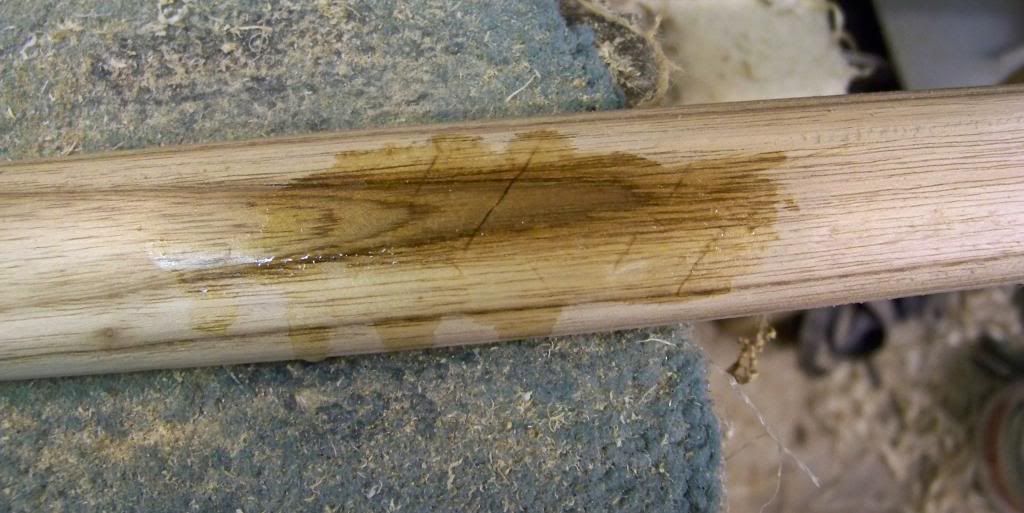
Been pulling it with my string shortening toggle on to get it to the right brace height, but now I'm worried that the upper limb will chrysal so I'm heat treating it again, some areas felt soft like they hadn't been heat treated or the heat treated layer had been rasped off. Blimey I'll be glad to go to work tomorrow for a break.
Still it's a good learning exercise and I quite fancy the idea of an Ash bow with the back being the under bark surface but the belly faced with a slat of quarter sawn heat treated Ash. Mind it sounds like a lot of work especially when I have other woods calling to me.

Sunday 30 March 2014

Long Belly Patch

It's been interesting doing the patch. Having rasped off about 1/8" from the belly I thought I'd got past the chrysal, but when I cleaned it up on the belt sander to get an nice even flat area I could still see it. In the end I went down about 4mm and there was just a hint of the main one still visible. The slat of Ash (7mm thick) was heat treated and I could see the heat had penetrated right through it so it should provide a good solid belly (see the vertical pic which shows the underside)


The close up (right) shows how the patch is quarter sawn with the grain (growth rings) running back to belly. The term 'grain' gets a bit confusing, obviously its running along the bow too, but the growth rings in the main bow follow the back of the bow. E.G the back of the bow is simply the under bark surface. Whereas in the patch the rings run at 90 degrees to that. One of the guys asked me what effect that would have. The honest answer is 'I dunno' but one could argue that any discrepancy in strength between the various rings will be better averaged out with it done like this. Laminated bows often have the laminations cut this way and self bows can be made like this too.

The patch goes almost the full length of the limb, extending into the stiffer handle area and up towards the tip where there is less bend (due to the lower leverage near the tips). It's almost a complete belly lamination. The actual chrysals had spread over about an 6" length so it seemed wise to do a nice long patch.
I will need to be careful that I don't have the lower limb too stiff and over strain the upper and make that chrysal! The last pic shows where I've started work blending the patch into the bow... the danger here is you blend it in exactly as it was before and end up with exactly the same problems. I need to get it roughly to size then get it on the tiller for some cautious flexing.

Saturday 29 March 2014

Ash Bow at Medieval Corner

The bow was both a great success and a bit of a disappointment.
The great thing is, Dave could really get a full draw and was lobbing arrows a good way down range.
The disappointment was the chrysals spread and you can see from the full draw pic, the lower limb is looking weak. I had been hoping I could leave the bow with him as it was really useful for him to get the feel of that full draw and getting his elbow over the hill. Here is some slo mo vid (quarter speed) and a still.

I brought the bow home and will take the belly off the lower lower limb and replace it with a slat of quarter sawn Ash (given to me by a bowyer friend) which I will heat treat before glue up.
I'll check the draw weight before work and also measure the thickness at a reference point so I can see how deep the chrysals go. I'll also weigh it at 27" draw for one of the guys who tried it and has a shorter draw.
I'd better stop doing this and get to work!
Here's a still of "Medieval Dave" ... terribly confusing with 2 Daves... anyhow I though he was getting a longer draw than his stated 27" so we put some creen tape with it's edge closest to the nock at 28".
This still shows he gets to 28" !


Update:- Just rasped down the belly, the chrysals go about 4 mm deep. Whoops, damn, I forgot to measure the draw weight... bit academic really. More pertinent to do it after the repair and then all the Daves in Christendom can try it!


Friday 28 March 2014

Trivial Pursuits

I've been generating a lot of mess in my workshop, the fencing (now finished) didn't help. I've also been messing around with the computer trying to get Google Blogger working correctly again and restoring some speed. It functioned ok on my computer at work, so I set to turning off some of the extraneous crap that fills up our PCs uninvited... I suspect the Macafee software still lurking on there which didn't appear as a program in any list but was there at startup was causing the problem (if you are into this stuff run msconfig.exe). I stopped a load of stuff and it seems better now. I'm using Norton for security... the Macafee was left over from when we bought the PC despite 'uninstalling' it.
I hate MS Windows with a passion., but take a sort of perverse interest as I work in electronics.

Enough of that stuff.
I've been making a tube for transporting bows, oddly I can fit 3 bows into 65mm square section plastic drainpipe, but I can't get 'em into 68mm round. I've cut some of the excess pipe and flattened it using a hot airgun and putting a brick on it. This has then been cut to size and glued into the two sawn halves of a spigot adaptor to make two end caps. One fits into the pipe, the other fits over it. All this is so I can take some bows on a 'plane when I fly to the USA in May.
While tidying the garage I also found a thin off-cut of pale Waterbuffalo horn which I polished up, it's rather pretty and shows how the colour runs through it.
I'm going to try out the Ash bow tomorrow, see how far it will lob a variety of arrows.


Monday 24 March 2014

Ash Bow Update

I've been shooting it some more with relative comfort. The side nocks have been polished too (see belly and back view of the top nock, the groove for the stringer is visible on the back view but not from the belly).
It will get some decent shooting next weekend and I'll decide if I should patch the belly, maybe it will be a watching brief whereby I'll patch it if the chrysals spread.
Here's a video clip, it's not very good due to the dappled sunlight, but hey, I'm not going to set up a load of lighting and a backdrop... well not yet.
Google Blogger is still playing up, it will alow me to drag in a video for upload, but not a still pic.... bonkers

Sunday 23 March 2014

Ash bow at 32" Draw

The dreaded chrysals are still there, I've flooded them with low viscosity superglue, to help seal them... it probably won't really do anything (it hasn't) The chrysals are hopefully not going to spread as the tiller is now better, but the bow is certainly not up to the right quality.
It's a shame, I think I didn't get the tiller even enough soon enough, but to be fair, some of the problem was the various kinks in the stave. I don't think I necessarily applied too much load in weight terms, but I was possibly caught out watching the draw weight rather than the shape of the limbs as I winched it back early on, and early slight hinge where the deflex dip was probably what over strained that area and weakened it, or possible where I'd removed wood from the belly and gone through the hardened heat treated layer exposing the softer wood which allowed it to over bend.
Note some of the peculiarities of the tiller are the ntural shape of the stave, I'll post an unstrung pic in another post sometime.
Anyhow all the theorising in the world won't help. Bow making is about trying to prevent such things, but also learning the tips and tricks to allow you to cope with them. I can't tell how long the bow will last before it starts chrysalling and taking set, but at least it will get the privilege of shooting some arrows.
I've done side nocks on it, utilising their asymmetry to help counter the natural twist of the stave. I'll make a decent string and shoot it now.
Nearly finished the string, I'll shoot her in a bit and maybe if it has the makings of a decent bow I might rasp out the chrysals and put in a patch of heat tempered Ash... maybe.

Saturday 22 March 2014

Ash Bow 80# at 30"

The heat treatment did the job. Back on the tiller the outer 1/3 of each limb wasn't flexing, but I'd left them wide to help string line adjustment ant anti-twist measures. Some work with a rasp soon got the tips slimmer, in line and moving a bit.
It's still not the prettiest curve to a bow, but it will improve a little with the final tweaking.
Here's a pic to whet your appetite... mind the damn thing may chrysal or fold in half when it is at full brace and back to 32". I'm pleased and relieved I've got it this far, I'm hoping to maybe take it to the ILAA shoot at Hever castle in April to do a flight shot if I can fit it in around the other stuff that's going on.
Busy time of year spring, we have a family wedding in April and I have a trip of a lifetime coming up in May.
I'll keep my fletchings dry on that subject tho' (although some of you will doubtless know to what I refer).
Enough for now.

Damn Damn and Thrice Damn

The Ash bow is doing nothing for my opinion of Ash at all in fact it's even making me doubt my skill as a bowyer at times.
I was getting the tiller looking even at about a 4" brace. I pulled it back to 70#, which isn't excessive seeing as how I'm aiming for about 85#, the area where the deflex dip was seemed to suddenly be weak again. Close examination revealed the dreaded silvery diagonal hairline of a chrysal * .... groan, my heart sank.
So what do I do?
a) Throw it in the corner of shame?
b) press on regardless and end up with a puddingy 60# bow with a ton of set?
c) Heat treat that area again to toughen it up and press on carefully?
d) Put in a patch of heat treated Ash?
e) Make tea and toast.
Hmmmm I think I'll go for e) and then maybe c)
I don't hold out much hope, but maybe it will be ok as an intermediate practice bow for one of the guys working up towards a 100#. It'll prob end up being a freebie or a loaned out bow... it's not going to be fit for sale. Still it's how we learn.
Not only is every man his own safety officer. He's his own quality control too.
I'll post some pics if I get it back to a worthwhile draw length.

* Chrysals are compression fractures on the belly where the wood is over strained, they are barely visible and go surprisingly deep (3 or 4mm easily) they are usually visible as fine diagonal lines. There are pics on the Hazel bow page of my website 'Delsbows' down fairly near the bottom of the page.
https://sites.google.com/site/delsbows/home/hazel-primitive-bows

Wednesday 19 March 2014

Ash Bow Woes


The Ash bow seems to have moved some more so I'm heat treating the belly to correct the sideways bend and also taking out a deflex dip in one limb.

I did write some more and was going to insert some pics... however the blogger is playing up and Google Chrome crashes when I try to select an image to insert.
Hopefully it will get sorted... I've even tried it using Internet Explorer which usually solves these issues...
Ah it works if I go via photbucket...groan... ain't computers wonderful....
I'll upload 'em to photobucket and then download them to here when I can be arsed...
Ha! Got it going by downloading Firefox web browser.

The illustration shows a limb with a deflex kink in it. If force is applied in the direction of either arrow common sense says it will do most bending at the kink. Tricky to explain why, but in the case of the red arrow, the force acting straight down the limb is effectively acting on a column which is very strong in compression, at the kink, it is a bending force. Anyhow, experience has shown me that slight bends like that always appear to be weak.Hope that makes some sort of sense.

The bow was insisting on trying to bend sideways and go slightly S shaped. I think some of this is due to the back not being true. Looking down the bow one limb has the back sloping slightly high on the left while the other limb, it's high on the right (slight propeller twist)
Anyhow, it's been a right pain, the first try at correcting the sideways bend left the bow looking rather charred in the centre, the wood seemed to have shrunk a bit too! The the grip seem narrow after the heat treatment! (dunno if it was my imagination, maybe it was narrow to start with).
I was pleased I'd left the cambium on the back as it stopped that scorching too much. Hopefully I can get it flexing seriously now without it trying to go sideways. To be fair, I've been revising my opinion of Ash as it was working rather nicely and any longbow can try and go sideways.

Update:- This thing is a bit of a struggle, it's flexing better but the overall shape is like two straight limbs joined a few inches below the grip with about 5" of back set in the lower limb!
e.g. On the tiller unbraced the left (lower limb) tip is sticking up very high. I got the damn thing to a low brace and exercised it. When I then took it off the tiller and was looking at the alingnment the damn thing kicked in my hand and twisted inside out. That's to say the bow flipped to put the sting over to the back... the only way I could get it off was to lever it off the nock with a screw driver... another good reason for temporary nock overlays.
I'm currently heating some of that backset/reflex out of it, so that the two limbs will be more balanced.

Monday 17 March 2014

Shoot and Self Nocks

Great shoot yesterday at Avalon, I was worried that I would be too sore to shoot all day, but it actually loosened me up. I flagged a bit and got a tad grumpy near the end and I think we all need ed the hasty tea and cake break about six targets from the end. There were six of us from our club shooting together and it was a relaxed good natured affair. Two of us took the cards and scored, I did it for a change as it saved me bending down to pull arrows. One we settled to a routine the scoring ran smoothly with only the odd arithmetic blunder, (a tiny joke there, as all the scores are even numbers, thus when I had someone down as 235 something had to be wrong!)
Mick the blacksmith scored highest of our group (496 despite blanking the first two targets), but this was only decided by the last arrow. I did a respectable 470 over 36 targets.
One target appeared impossible, shooting up hill through a gap in the conifers at a bear with a cub standing in front of it. It looked to be a long shot, but it was deceptive, to add to the problem any hits on the cub scored negative! I was annoyed with myself as I put 3 arrows round it, the final shot from the blue peg was actually easy, but I missed. It didn't help that we'd been waiting a good while for the shot. One of the marshals said that everyone was miss judging the distance. It didn't help that onlookers we miss-calling where arrows were landing in an attempt to help and minimise lost arrows (actually, to the rules, there should be no 'sighting' of arrows by anyone else, but it wasn't a competiton ). My response to a call of  'Low' was an ill tempered 'it wasn't ***kin' low' as I stomped off to the next peg. I was what our family euphemistically call "tired and hungry" by then.
Two of our party managed first arrow hits, I'd have been happy with a third arrow hit, or even a negative score on the cub!

Thanks to Avalon Archers for a great shoot, and excellent catering.... coffee and danish before the last six shots prevented me becoming terminally grumpy!
I tried out my little video camera taking footage over the shoulder of Lawrence and Mick as the shot on the practice butts. The video wouldn't really show the arrow flight well enough on here, but I can certainly confirm that Lawrence's arrows were going sideways for the first 5 or 10 yards, he swapped to a different set of arrows half way through the day and his scores dramatically improved. Here's a screen grab of our group amongst the merry throng before the start of the shoot.

Explain More was ticked on the previous post.
Not sure what is needed, probably the grain of arrows, there was some discussion of this during the shoot.
The reason people don't notice it, is because it isn't clearly visible until you sand the end of the shaft. The rough sawn end disguises the grain.
If you grasp a shaft in your fist and rub the end on fine sandpaper (say 240 grit wet & dry) which is on a flat surface the end grain will soon show up. It is sometimes also visible along the length of the shaft.
Doing the nocks like this has the added benefit of ensuring that all the arrows have the same grain alignment and thus a more consistent spine. Apparently the spine should always be measured with the grain aligned so the arrow is flexing right to left in the pic, it is different in the other direction. I've not actually measured it myself. So even if you are using stick on nocks, maybe it's worth checking.
Personally, I'm probably not a good enough shot to notice the difference, but you are only as good as your arrows and the better matched they are, the more consistent they will be. making arrows isn't my fave, but I do at least keep 'em the same length, same weight point, same fletchings and same grain alignment. There are those who weight and spine match all the arrow in a set. Thats great if you enjoy doing it, I'd rather make the actual bow, but I'm certainly not decrying it.
Note:- If I was doing a horn nock insert on a heavy arrow I'd put it in the way the red lines run for maximum strength. The nock would then be cut at 90 degrees to that. The horn takes the load from the string and transfers it to the wooden shaft, so the horn /wood joint is where the strength is needed to prevent splitting.
There may be other opinions, so trawl the web if you want, I don't profess to be the authority on this!

Saturday 15 March 2014

Nocks Points Glues Bone

I had an E-mail asking about self nocks, I said how I did it, but here's a pic of one anyway. There is tons of stuff if you do an image search for self nocks, all sorts of jigs and stuff, but basically it's down to sawing a slot and opening it and adjusting it with a needle file or similar. I go for a slight keyhole effect which will click the arrow onto the string. A few turns of linen thread whipped on below the nock and sealed with a wipe of epoxy or a drop of low viscosity superglue will seal and secure it.
Talking of Epoxy, I usually use Araldite Precision (AP) for gluing on points, but it is getting stupidly expensive and difficult to find without paying postage. My usual 10 minute epoxy is great for most jobs but doesn't seem to hold on the points, maybe a tad brittle. Anyhow, being a cheapskate I'm trying some EvoStik Control which I suspect may actually be the same stuff as AP and it's less than half the price (£3 on offer in Wilkinsons) It looks, feel and smells like AP, the curing times are the same too. They do it in the tube and the double syringe.
Anyhow, I've been refurbishing a few arrows for the shoot tomorrow. I'd run out of points so I ordered a load of stuff from Merlin Archery. The points look pretty good, the internal taper doesn't go quite as deep as the point I was using, but that can be handy as it effectively lengthens the arrow about 1/4" (handy when re-pointing a load with broken tips). I usually use white and yellow fletchings, they didn't have any white in stock so I've ended up with lime green and sky blue... hmmmm a bit lurid, but wha'eva'. At least they will visible in the leaf litter. I haven't made up any arrows with 'em yet, I'll probably wait and do the full dozen.


I'm taking it easy today, I got out all those fence posts yesterday and I'm walking like a duck today, hopefully I'll have loosened up for the shoot.

While I was doing the fencing I noticed a length of bone on the garden, probably dropped by a fox. I'm guessing its maybe sheep/lamb? I thought it fell to hand nicely and might make a nice handle for an arrow digging knife or some such once it's cleaned up. It's a usefull raw material anyway.


Friday 14 March 2014

Shooting and Fencing

I've been shooting a few arrows every day to get in some practise and ease off a stiff neck. I think thwacking away endless arrows at 10 yards is pretty pointless, so I tend to shoot maybe 10 in a session. I also like what I call the 1 arrow challenge. I'll pick a small target and maybe try to vary the shooting position a bit, but only have one arrow with me. It concentrates the mind and can bring surprisingly good results. Of course I can go and retrieve the arrow and have another go if I screw up, but it does add some focus.
The fencing? Ah, I'm repairing about 14 yards of fence between my garden and next door's. It's her fence technically, but I don't mind doing it and going 50/50 on cost. I was thinking it would help build up some fitness. Blimey I'm stiff as a board this morning, I'd twinged a hamstring too by foolishly breaking into a sprint with the sheer exuberance of spring!
Still, no pain, no gain.
Trying to dig out rotten fence posts is a nightmare, fortunately when I did the fence last time (about 14 years ago) I wisely shunned concrete. I'd been designing and planning various post pulling strategies, but when they are rotted off to about 2 foot below ground level it's down to pretty much scrabbling about by hand.
A 3' long length of steel bar with an inch bent over at the end mounted in an electric drill helps stir it up a tad, pretty vicious and needs a good deal of care. I dubbed it my post whacker, which does rather sound like a dubious euphamism. (Don't try this at home boys and girls).
A couple of the posts hadn't rotted so deep, so I managed to scew in a big fat coach bolt, get a rope on it and lever them up and out with my 6' pry bar. Only got one to go, but it's an original post which had ben set in concrete.... that will be hard work.
After tea Daniel Craig and Kiera Knightly dropped by for a few rounds with sabre and foil...
which was nice.

Monday 10 March 2014

Just Can't Stop Myself!

I'd had enough of making bows for a bit, so I spent some time running errands and sourcing some fence posts on the interweb to repair a fence with rotted posts which had become loose in the recent high winds.

Next thing I know, I seem to have picked up the Ash bow stave and winched it back on the tiller.
It has been sitting on a raditor for a week and had taken a slight sideways bend of about half an inch, it may seem foolhard to have put it on the rad' but I'd read that Ash (like Hickory) needs to be good and dry, it's been well seasoned (at least 2 years). I'll also be heat treating the belly later so some extra warmth won't hurt.
Pulling it back on a string just long enough to get over the ends and taking it to 90# has got it moving almost enough for a shorter string and a low brace. I'm working it hard, but have taken care not to over stress it, as evident from the little bit of natural reflex still being there. I'd left the bark on for protection but I've now taken that and most of the cambium off with my spokeshave. A thin layer of cambium has been left providing some protection for the back and a clean surface for me to mark out if I need to re-draw the centre line at some point (prob' won't need to as it's mostly done by eye now).
I'm hoping to avoid coming in under weight this time, I'm looking for about 85# and hoping for that elusive blisteringly fast flight/warbow. It's the Bowyer's natural optimism that makes 'em think each new bow is going to give a personal best. Maybe it will improve my opinion of Ash too, working it with good sharp tools help and a big bow lends itself to using a plane more.
This article by Jaro Petrina has inspired me to have a go with the Ash.
http://74.209.214.7/~englishw/Making_a_whitewood_longbow.html

Here's a couple of pics of the Hickory backed Yew and the Ash. You can see the Hick' backed Yew still has a tad of back-set/reflex and the Ash still has it's natural reflex. You might just be able to make out the cambium layer on the Ash, and I left a bit of the bark at the centre to act as a reference.
It also shows how I've built up the back of the Hick/Yew with leather to round the grip and make it more comfortable, I'll fit a leather grip over that area sometime.

Sunday 9 March 2014

Great Spring Day

What a great day, glorious sunshine, Brimstone butterflies, Frogs croaking in the pond.
I went up the club to test the Hickory backed bow and the refurbished Yew bow which are V similar draw weight. Mick the blacksmith met me in the car park with a present. I'd been taking about small curved draw knives and spoon carving knives, this had caught his imagination and he'd set about making one for me!
It's a great excuse to use my lathe to turn up some nice handles for it, can't wait to give it a go. He said it's made of EN42 steel. It just the right size for those tricky areas around knots and the dips in back of a bow.
Brilliant, cheers Mick.

The bow testing went well and I threw caution to the wind and took both bows to a full 32" draw, the new bow shot about 10 yards further than the refurbished one, which was to be expected. They both threw a heavyish arrow, 32" 11/32 shaft 150gn point (562 grain total weight) over 200 yards.
I tried my flight arrow from the Hickory backed bow and was surprised to find it only went the same distance?? To my chagrin JT reminded me that I'd paced back an extra 25 yards from the shooting line before I tried it! So it actually gave about 240 yards. The flight arrow weighs 382 grains (for comparison my 'standard' arrow weighs 408gn)
I was slightly disappointed at the flight arrow distance and had to remind myself that the bow which threw that arrow over 300 yards was almost twice the draw weight (100#).
I had been considering taking it to an ILAA shoot next weekend to try it flight shooting, but I think I'll leave it until I have a bow with a bit more weight. I'd managed to shoot round some of the 3D targets with it and feel it's a manageable weight. A sensible top weight for me is probably about 85-90# , mind I'm keen not to go daft and injure myself by trying 100# again. There's a shoot at Avalon (Sandy in Bedfordshire) next week which is a superb venue,so I'll take 'Twister' my primitive Yew bow to that instead.
Update:- I found a nice offcut of Laburnum and turned up some handles, they are rudimentary at the moment, once I get to use it I'll adjust them to a more ergonomic grip, then after a few generations of bowyers have used it they'll get a nice patina.

Saturday 8 March 2014

Whew!

Having left the bow unstrung, the crack closed and became virtually invisible, I felt this was a good sign.
I clamped the bow in the vice with some rubber strapping tied just below the crack so that I could bind it tight very quickly. I flexed the bow to open the crack and flooded it with low viscosity superglue. The  pressure was then reversed to close the gap and the rubber bound round tight.
The strapping came off after a couple of hours, I had to sand it off in places where the rubber has stuck. The hickory back has been thinned and rounded substantially at the edges to try to weaken it a tad the theory being that the load should be evenly spread between back and belly.
I've strung it and flexed it this morning, the draw weight is nicely manageable, but prob lower than I'd hoped.
I'll get some horn nocks on it and hopefully try it out tomorrow.

Update:- The draw weight is a bit low 62# at 28" and about 68# at 30",  I've had it on the tiller, pulling it dynamically and shot it at both 28" and 30" draw. It seems what is technically known as bloody fast but I'll have to shoot it through the chronometer. In actual fact it's probably a fairly sensible weight for me and the fact that it can be flashed back to 30" for flight could be interesting.
The flat back feels nasty in the hand and I'll build it up with something, either wood or leather. Maybe some Yew sapwood.
Anyhow, it's been a good learning experience and a cautionary tale that rushing a bow will almost certainly guarantee you come in under weight.
Update2:- Been shooting it through the chrono', it's about 170 fps which is pretty good. The early cautious shots, prob at 27" draw were about 160. Then I got some consistent readings around 170.
You may wonder why so vague, but it's surprisingly hard to get good consistent readings, I got one over 500 fps and one at 179, They were both miss-reads. The problem is the flexing of the arrow (not such a problem with a modern target bow or a crossbow. It can happen that the middle of the shaft triggers the first optical sensor then the point triggers the second, this would give an unrealistic high reading. Maybe it would be better with the chrono' high up about 30" in front of the bow. There isn't convenient room in the garage to set it up like that with suitable lighting and backstop. maybe I'll try to do it sometime. Better to set it up out doors in daylight, then I'd just need the backstop.

Friday 7 March 2014

Hickory Backed Yew - Damn!

The guy came over to collect the Spliced Billet Yew longbow yesterday. The draw weight and length was just right and he was very happy with it. He felt it was fast compare to his previous bow. We had a play with my Chinese repeater and some other bows which was most enjoyable.
I made a bit of a mess up, I'd hurriedly tried to take some video of him shooting but managed to somehow screw it up, having not used the camera for a few weeks. Dunno if I took no pics or just 1 second of video, or it got lost when I tried to download it. I even searched the PC for *.mov files... Nope, no sign of 'em. Not only that, but I had a golden opportunity to get rid of some of my sacks of firewood as he had a wood burner... of course with the fun of trying the bows we both forgot.
Anyhow, no harm done, and he was really pleased with the bow, saying it looked better close up than it did in the pictures.
I'm pressing on fast with the Hickory backed Yew, as it is dead flat on the back it is much easier to measure, mark up and work than a natural stave. I've even been using my plane on it, which is a tool I rarely use. I've made a good deal of use of the belt sander too.
It had a fair bit of natural reflex, but I glued in some extra too. I expect most will pull out during tillering.
I s'pose I should say what I'm aiming for... hmmm... how about 85-90# at 30" ? I feel that's enough weight without hurting my shoulders and 30" is about my maximum comfortable medieval style draw. I hope to get it shootable for Sunday.
I've had it pulled back on a long string at 80#, (see pics)

the tips are back far enough to get it braced. Time to adjust the tiller a bit and get a shorter string on it.

Update:- Damn, got the shorter string on it at a low brace and was rapidly working my way up to 80#, I heard a couple of ominous 'tic' noises, was it the string moving in the nock? There was no explosion, but the draw weight seemed to have come down a bit. On investigation I found the Yew had buckled on the belly about  3/4 of the way down the lower limb. The temptation is to flood it with superglue and bind it, but I'm not sure, it may be better to glue in a patch. Mind it will be tricky to patch it with the Hickory backing there. It just goes to show there's many a slip 'twixt cup and lip. They always fail as you get near full draw, hmm just nature's way of stopping me getty too cocky and complacent. D'oh!
Mind it's an interesting failure, I've not seen Yew do that before, maybe the Hickory back was too strong for it? I'm not giving up on it, but maybe I'll be shooting for a slightly lower draw weight now.

Monday 3 March 2014

Spliced Yew Finished, Pics.

I've done the arrow plate, a nice big slab of Mother of Pearl, it looks great against the black leather grip.
I'm very pleased with how it looks, the billets not being matched hasn't spoiled the look, the two limbs have their own character but the colour looks remarkably similar and the overall look and feel is great.
Ill let the pics do the talking.

I've got the refurbished bow finished too.
Now I'm now hoping to get the Hickory back glued onto the Yew belly for my flight/warbow this afternoon and maybe rough out an Ash warbow for one of the guys at the club.
I've had to strip down and adjust the bandsaw as it wasn't running true. Ash is V hard on a saw, so I wanted to fit a new blade and get it in top fettle before trying to cut.

Update:-
I've roughed out the Ash, leaving the bark on the back as it's not too thick and it's V smooth, it will doubtless pop off during tillering. The time spent adjusting the bandsaw and fitting a new coarse blade (3tpi alternate set) was well worth it. It cut slow and steady, nice and clean. I'll have a breather and then rough out the thickness. I spent some time setting up for the first cut, angling the table so that I'd be cutting a flat face parallel to the back of the bow (the bark of the tree). I'd started with a quarter of a log so it was V shaped. That first cut took off the point of the V giving me a flat surface to rest on the table for the next two cuts which gave the basic shape of the bow. 40mm wide for a foot either side of the centre line and then tapering to 30mm at the tips. That leaves plenty of width to play with, this is only roughing out. It's about 43mm thick along the whole stave at the moment, tapering that will be the next step.

Oh, I forgot to say I got the Hickory back glued onto the Yew belly before lunch, so I've been a busy bowyer. Back to the day job tomorrow, so it's good to get plenty of fun stuff under my belt today.


Saturday 1 March 2014

Repaired Yew Bow & Testing The Spliced Bow

It's been a busy couple of days, the more work I did on the repair bow, the more I wanted to give the sorry thing a new lease of life. I'd already removed a good bit from the last third of the top limb and some from the end of the lower
I was given carte blanche to go ahead and experiment in an attempt to revitalise it.
I heat treated and straightened the inner half of each limb. While I was at it I noticed the bow was actually about 0.5 mm thinner at the end of the grip than it was for the next few inches up the limb! That is just madness, so I rasped off the high spot and blended it all in. I also noticed a knot with a semicircular pinch alongside it. I though I'd pick at the knot and fill it if it was weak.


During heat treatment it became obvious the knot was loose and it popped out.
I'll let you see the results from the before and after pics and judge the results for yourself.
The tiller is much better, still not quite as circular as I'd like but it's a wise man who knows when to quit.
If you compare it with the picture from a few posts back http://bowyersdiary.blogspot.co.uk/2014/02/the-wisdom-of-waiting.html it's the same draw length and you'll see the draw weight is actually a whisker higher and the tiller is much better. I've noticed that it was being shot with the arrow pass actually on the grip, I realised why when I measured and found the grip was dead centre rather than 1" above and 3" below the centre line. So the nocking point and arrow pass made sense.
The difference is very obvious when trying to string it... I can't ! I've had to cut grooves for a stringer into the horn nocks, while I was at it I removed more dead weight from the nocks, they were riduculously oversized.


This morning I took the spliced Yew bow to the club and shot 18 3D targets and also shot it for distance. I had planned on taking a flight arrow but forgot.
It shot my standard arrow about 160 yards and the 30" ones a few paces more. I think it would have made the 180 yards for clout with flight arrows. 
Shooting at the 3Ds in the woods the bow performed really well and I shot pretty much as I would with my regular field bow 'Twister' . One of the other guys shot it too and was impressed. I took some of the shots with the longer arrows which felt odd as my anchor was near my right shoulder... I still got a couple of hits like that.