Blimey, the season of fruitfulness is on the way.
As I walked back from the town I saw a load of windfall plums on the cycle track. I filled a carrier bag full to make wine, (some of the best ones were saved for eating).
As I passed the woman next door I asked if she wanted to see my plums! (Not really, but I did show 'em to her!)
I've taken the stones out, mashed 'em up and got 'em steeping in water for a few days, they'll make up 5L of wine with the addition of sugar and yeast. (I bought some yeast for this... I don't bother when I do my cider, the apples seem to start fermenting naturally with no problem).
I've been tweaking and tuning the Molle' with some advice from the Primitive Archer guys. I've narrowed the levers slightly and lost some mass where they blend into the working limb. I noticed the lever I'd done last was actually more finely worked and a bit slimmer anyway. I also took about 1/8" to 3/16" off the arrow pass as I'd noticed the lightest flight arrow (0.255" diameter shaft*) had wagged its tail quite severely for about 20 yards as it left the bow when shot for distance the other day.
I tried the bow with the heavier flight arrow at 10 yards in the garage, it flew beautifully straight and stuck into the boss nice and true.
Dare I risk the lighter one? I didn't want to risk it striking the boss whilst flexing or travelling at an angle and smashing itself.
I plucked up courage and went for it... it left the bow with a bit of a waggle but straightened up before sticking in the boss.
Excellent! I reduced the arrow pass just a whisker more, but if it straightens up within 10 yards that's pretty good.
Hopefully I'll have gained a few yards when I try it again on Saturday.
*There is some confusion over the arrow shafts, I had 4 at 9/32" and 4 at 1/4" but 3 were shorter than the others and I thought they were the 1/4" ones.
The first one I made that nose dived into the floor was definitely 1/4" and I thought I'd gone up to the 9/32" for the mark 2.
However measuring them, it seems I've used another 1/4" shaft, or maybe the repeated sanding has bought it down to the same size as the 1/4" ones?.... err... I'm droning on rather now.
Would you like to see my plums?
Thursday, 30 July 2015
Wednesday, 29 July 2015
Molle' Distance Shots

 I made up a couple of flight arrows and tried the Molle'
I got 226 yards with a 276grain arrow and 261 yards with a 201grn arrow.
My daughter had a go too, she was a bit more tentative but still got over 200 yards for her furthest ever shot.

 Dunno where this year has gone, I've noticed the apples are ripening and our next door neighbour left a bag of wind falls on the doorstep. I'll have to sort out the garage ready for cider making, it's one of thos things which marks the passing seasons, along with blackberry and apple pie.
I've looked back and its over 5 years I've been doing the blog. I'm still enjoying it as I don't treat it as a chore, more like a journal or a reference work. I can follow the statistics and see which post are being viewed each day, sometimes I'll see posts I'd forgotten about which can be a pleasant surprise.
Here are some pics.
And to finish, a sad tale.
The fast, reflexed Boo backed Yew I made some time back was the proud possession of a lady archer. Some "helpful" idiot strung it for her... yup, you guessed... being a total idiot with no understanding or appreciation of bows and their construction or design. He tried to string it backwards and smashed a limb. It's completely broken the Yew belly and even splintered into the Boo back. It's beyond repair, but I've offered to have a go and see how far I can push the boundaries of repair as a learning exercise.
The moral is don't let other people string your bow especially if you are a lady and some macho idiot is out to impress.
She was V upset, and as the bowyer, so am I. It was the fastest longbow of that weight I'd made. damn fellow should be horsewhipped.
Sunday, 26 July 2015
Good Weekend
 I went down South to visit family and managed to fit in some archery too.
 Surely one of the most unusual archery venues is Fort Purbrook on the Portsdown Hill just North of Portsmouth. The archery took place in one of the dry moats which is accessed via a tunnel cut through the chalk of the Downs (you can see the strata if flint in the tunnel wall.). I was made very welcomed and I let some of the archers try a couple of bows.
 The 40# bamboo backed Yew I'd made a while back found a new home. The guy who had originally commissioned it suddenly disappeared, which is fine, stuff happens that is more important than bows, but it was good to find a home for the bow.
Daniel the guy who runs the club had a go with the 50# spliced Yew billet bow. He was favourable impressed and it was good to see it shot by someone who is a good shot.
I like the way the curve of the bow is echoed by the arch in the wall behind him and the way the arrow is framed in the line of brickwork...The picture was carefully framed like that of course (cough splutter).
I showed off the Molle' too and had a shot into a target on the indoor range before we walked down to the moat. It slammed into the target impressively and Daniels expression showed some surprise at the speed.

 The weather was poor over the few days I was away, two days of heavy rain and two of sun. I got some odd jobs done for my Mum and some archery shopping at Quicks.
Had a walk in the woods too which was glorious, following the heavy rain there was a hint of Autumn in the air. I spied one dead Yew tree that had a glorious limb on it like the spar of a ship, unfortunately it was rotten and covered in orange red blobs of fungus.
In the garden, the bumble bees made the best of the sunshine and watching them on the Echinops made me smile. They managed to go about their business like giant furry aliens on these Purple planets without bothering each other. If only we could exist on our world with such good manners.
Update:-
Damn! When will I learn, just spent ages making a point for a flight arrow (1/4" shaft) I put a sliver of horn in the back end and cut the nock. I thought I should see if it flew before "wasting time" putting on the flights. damn thing nosedived and smashed in half on the garage floor. Now maybe the point was too light (24gn) or maybe I'm just an ass for trying it without flights.
(Answers on a postcard to You are an Ass Del. PO box 123 Harlow Essex)
I'm just writing this as a reminder to myself and a note of the point weight.
I still have the point and have just stuck it onto a 9/32" shaft... I'll fletch it before testing this time...
Tuesday, 21 July 2015
Molle' Test Figures
I put it up on the tiller and pulled it back to 24" with a good deal more confidence now the bend is more even. A very pleasing 45 pounds.
A bit of tape round one of my arrows at 24" to avoid overdrawing allowed me some test shots, it seemed pretty fast, but very hard to tell.
So I set up the chrono' and cut an old arrow down to 24" and stuck on a 70gn point.
The results are a bit variable as it's hard to get the real maximum draw and a clean loose. the first tentative shot was a disappointing 151 fps... then it got better.
179.7
180
190.7
171.5
All pretty impressive. I'll be popping into Quicks the archery shop at the weekend, I'll buy some 9/32" and 1/4" shafts to make up some flight arrows to try it for distance.
Monday, 20 July 2015
Floored!

 Blimey I'm tired out. I got the floor 99% laid on Saturday, but there's all the fiddling and finishing with cork edging on some edges and refitting skirting board on others. It's all the constant standing up, kneeling down, standing up, kneeling down. Still on the plus side I can feel it's been good for my general fitness level, if not my grumpiness!
Anyhow, I've managed a few minutes cleaning up the Molle' and I couldn't resist a wipe of Danish Oil on one lever to see what it will look like... nice.
The sapwood backing gets thicker as it runs along the lever, I did that to ensure I had enough thickness as the re was some bug damage in the Cherry.
I've got a little bit more skirting board to do... I don't think it will get painted any time soon tho'
I can imagine when I eventually shuffle off this world I'm not going to be thinking...
"I wish I'd painted more skirting boards"
Friday, 17 July 2015
Whew!
 I've been doing some preparation work for laying a new floor and while I'm waiting for cement to dry where the floor needed patching I've been fine tuning the tiller on the Molle'.
I've got a good full draw to the target 24", plus a tad as the brace is low still.
Damn thing is I can't see the draw weight from the video! The bow is so short I've zoomed in and the scale is off the bottom of the pic. I think it's about 45# but it's so nerve wracking flexing it I've quit while I'm ahead.
You can see I've got horn overlays on the nocks and the levers (especially the right) have been substantially slimmed. I think it will look stunning once it has a wipe of Danish oil on it
The curve on the limbs looks pretty good to me now.
Now this is where I don't get the whole Molle' argument.
Imagine I take a hint off the belly side of the levers so that they flex. The bow could be pulled so that the existing 'working limb' is in exactly the position it is in the picture. The tips would be back a bit further due to the flexing of the levers, so we'd have a longer draw and thus more energy storage surely?
When loosed the 'working limb' would recover to brace in exactly the same time as it did before, or maybe a tad quicker as we've lost a bit of mass from the levers. So we'd have longer draw and less mass at similar poundage...
I can't see that the slightly flexing levers would somehow lag behind as they can be considered as separate short stiff limbs with a small deflection which would presumably recover before the ralatively longer working limbs which have a substantial deflection.
I dunno, a real analysis is beyond me... and that's why I'm making it. The proof of the pudding is in the eating. I suppose I could get performance figures and then reduce the tips to get 'em flexing, mind the change in performance would probably be less than the experimental error.
I'm not even entirely convinced a CAD system could be realistically programmed to give the real answer...
Thursday, 16 July 2015
Scarey Molle'
 Blimey this Molle' is scaring the heck out of me. I've reduced the thickness by degrees and at one point overdid it so the left limb was in danger of forming a hinge (weak point where it bends too much) in the outer end.
 Damn, I thought I'll end up with a 20# bow, but nope, I still had to take off more. One of the guys on Primitive Archer warned the limbs can get scarily thin, but maybe that will make 'em less likely to chrysal if the tiller isn't perfect.
 I think the tiller isn't too bad, it's tricky with the undulations in the natural Yew sapwood back. It would obviously be easier with machined timber... but if I had to trust a backing, it would be good old Yew sapwood (or Bamboo).
Still not sure of the draw weight I'm aiming for... I chickened out of going for the 50# as the tiller isn't spot on yet... close, but no cigar.
 I don't want to risk smashing it before I shoot it. The bit I'm really looking forward too is getting the levers as slim as I dare to reduce the tip mass, I'll go for a tear drop shape with the belly side narrowed to allow the string loops to sit nicely.
It's been very satisfying how quick this has progressed. The Cherry is a joy to work, and I've done the thickness by marking every 3" and rasping those points down to my desired thickness (or near enough) I can use the spokeshave to remove the wood between the rasped out portions. Quick and effective. That gets me to the roughly the right thickness, but then the real tillering is by eye and feel.
Wednesday, 15 July 2015
Mollegabet First Flexing
 To some extent I've tried to make the bow 'by numbers', but that's just to find a start point. I based my figures on advice on the Primitive Archer forum modified a bit to suit the wood I had in front of me. I've used a thickness taper of about 1mm every 3" but this is only V rough to start with and tricky to measure as the Yew backing is rather undulating and still has the thick dusty underbark layer on it. It's horrible stuff, dry and dusty, really gets up your nose.
 The principle of tillering is always the same for me. Get it looking fairly even then look at it on the tiller pulling to full target draw weight as long as the bend is ok.
It's all very much guess work, but is looking promising. I'm still not sure if I'm going for 40# or 50#... maybe even 35#!
What does it show me?
I need to take a lot off,.
It's bending fairly evenly.
The right limb is a tad stiffer than the left.
It doesn't explode when loaded up to 50#
Thinking about it, I'm probably going to aim for 35-40# because 50# at a short draw (24") would feel very hard to pull. Has pulling it to 50# done any harm? No, because 50# on the slack string is much less strain than 40# from braced on a short string.
I can also see it will look gorgeous with the pinkish brown Cherry and the creamy white Yew.
I've probably gone a little short on the levers. I missread the advice to make 'em half the limb length as half the "working limb" length. Still, it doesn't matter, I can always graft on some extra length with a little bend towards the back of the bow if I fancy it. I also like the longer working limb on this short bow for security.
It's my first Molly so it's about learning and experiment, I'm not expecting perfection. I'll be happy if it shoots and last for 100 shots before chrysalling or exploding!
Tuesday, 14 July 2015
Mollegabet

Do the light outer limbs make up for the extra stress and bend? Some people say the levers give extra movement at the tips, but I don't see how they can give more movement than the same length of limb that actually bends a bit.
 Anyhow having finished the last bow and getting ready to lay some flooring next weekend I wanted a quick fun project.
One advantage of having accumulated loads of odds and ends of timber over the years is that I can usually find something for a quick try out experiment. I have some cherry that was cut from standing almost dead a good few years back.(2010)
http://bowyersdiary.blogspot.co.uk/2010/11/dead-standing-timber.html
 There was bug damage in the outer wood but it had been planked up to a suitable size.
because of the bug damage I laid the bow out with the central pith on the back of the bow (see middle pic). Now that and the fact that Cherry can be a bit brittle made me decide to back it,...but with what?
Ash, Hickory, Hazel, Rawhide are all candidates, but I found a piece of Yew that I'd sawn off a stave that had very thick sapwood. It still had the bark on and was probably too short for a longbow.
Perfect, both the Yew and the Cherry work easily and quickly with with drawknife and spokeshave. They are both very light woods and hopefully well matched. I do have Bamboo, but felt that was probably much to strong in tension for the Cherry.
The cherry was first cut to shape on the bandsaw. I had it all done in about an hour or so and I've got it glued up this afternoon. It was quiet at work, so I took the afternoon off... I can't abide enforced idleness and the components I'd ordered hadn't been delivered yet.
I strapped it up and then tied it down to a length of 2x2 back side down with a small block under the grip just to hold it straight /slightly reflexed while gluing. (The Cherry had a slight deflex as it was worked down).
The bow may well explode as I'm planning on pushing it hard to see how it performs. I'm aiming for 40-50# at about 24" draw. I'm going for a short draw to get a more aerodynamic arrow length for flight shooting. It should be interesting to see what it does.
Sunday, 12 July 2015
Before and After
 I couldn't resist trying to juxtapose a pic of the finished bow alongside the raw stave... it's not perfectly lined up but it gives a good idea. I'd been wondering about the set, but seeing it next to the stave shows it's actually pretty good.
It really shows how much wood gets removed.
The bow is all finished signed and waxed ready for collection tomorrow.
Saturday, 11 July 2015
Distance Results for the last two bows.
 Last night I marked all my flight arrows with their weight in grains and approx draw length. First thing this morning I made up "Del's Gravitational Trajectory Indicator" from some old perspex sheet, to allow the launch angle (45 degrees) of arrows to be checked (by the spectator not the archer himself).
It's just a rough guide, as I'd been put off in the past by people suggesting I was shooting too high.
I believe the optimum angle is a degree or two less than 45, but that's hardly accurately achievable without a shooting machine.
Me and my mate JT spent an hour or so testing out some bows.
I was testing out the 52@29" spliced Yew billet bow and the 80# @30" Yew.
JT warmed up on a few big bows and then tried the 130# Yew bow I made him some time back.
He's now completely mastered it and was shooting it with aplomb.
The launch angle indicator soon showed we were both pretty much at the right angle, although JT didn't use my exquisitely manufactured pendulum facility, he just lined it up with the hedge row... spoil sport!
We tried a variety of arrows with the bows.
First up the 52# @ 29" Billet Bow.
My standard field arrow 390gn 177 yards
29" Flight arrow 307gn (my nicest arrow) 208 yards
Then the 80# @30" Yew
My standard field arrow 390gn 196yards
30" Flight arrow 475gn 220yards
30" Flight arrow 404gn 232yards
EWBS* standard arrow 160yards
(*English War Bow Society)
Out of interest I just looked up the latest EWBS flight records to try and find something comparable.
http://www.theenglishwarbowsociety.com/TMAF%202015%20Flight%20Shoot%20Results.html
The closest I could find was this:-
Standard Arrow. Mary Rose Bow (which is pretty much what the 80# Yew bow is)
Christine Carnie 86#@32" 155yds (bowyer Pim)
The nearest thing I could find for a flight arrow was:-
http://www.theenglishwarbowsociety.com/records2012_EN.html
Christine Carnie 80# @32" 184 yards with an Italian Yew bow by Pim
Now comparing flight records is fraught with problems... We had a following breeze and it was a fine day. Maybe Chrissie Carnie hasn't got a full 32" draw... I don't know.
Ah, I've found the Junior records (2013) which are with an 85# bow and are a bit longer 85# giving 170 yards with a standard arrow and 84# giving 234 for flight.
I'm not claiming anything other than the bow performs decently.
Now the interesting thing with the above results is that the flight arrows are both heavier than my standard field arrow! Some of this is due to them being an inch or so longer and also I used plastic nocks. The implication is that if I barrelled the shaft and used a nice faired in nock and a lighter small diameter point I'd have got substantially further.
Dropping from 475 to 404 grains gained 12 yards, although it may have just been a better loose. We could drop down to maybe 300grains minimum.
Inspecting the Yew bow showed the arrow plate was doing its job as all the scuff marks were dead centre on it.
JT tried the 130# Yew and got 260 yards with a 623 gn flight arrow of mine.
He could doubtless go a bit lighter (and smaller diameter with smaller fletchings) but we were being cautious.
 There is some discussion about the optimum grains per pound (gpp) of draw weight for an arrow. It's down to trial and error and it depends on the characteristics of the bow.
5gpp is probably a reasonable start point. 3gpp is probably getting rather light. That would give a range of 650-390 grains, so the 623 is pretty reasonable. The diameter, spine an fletchings are V important.
This post shows some test results I got for velocity and energy using a crossbow pistol.
http://bowyersdiary.blogspot.co.uk/2011/11/mass-velocity-and-energy.html
Ah, yes, I inspected the belly of the 130# Yew bow and there were a couple of small pinches (compression fractures) emanating from small knots, nothing to worry about, but something to keep ones eye on. The back of the bow is the vulnerable area, and any cracks or splinters there need immediate attention.
Bottom pic shows some more shooting in... I'm going to have to spread 'em about a bit more for fear of smashing the nocks off 'em! I'm probably not getting a full 30" draw and I probably won't get the usual full 100 arrows through it. 30 or 40 will have to suffice.
Friday, 10 July 2015
Arrow Plate Done
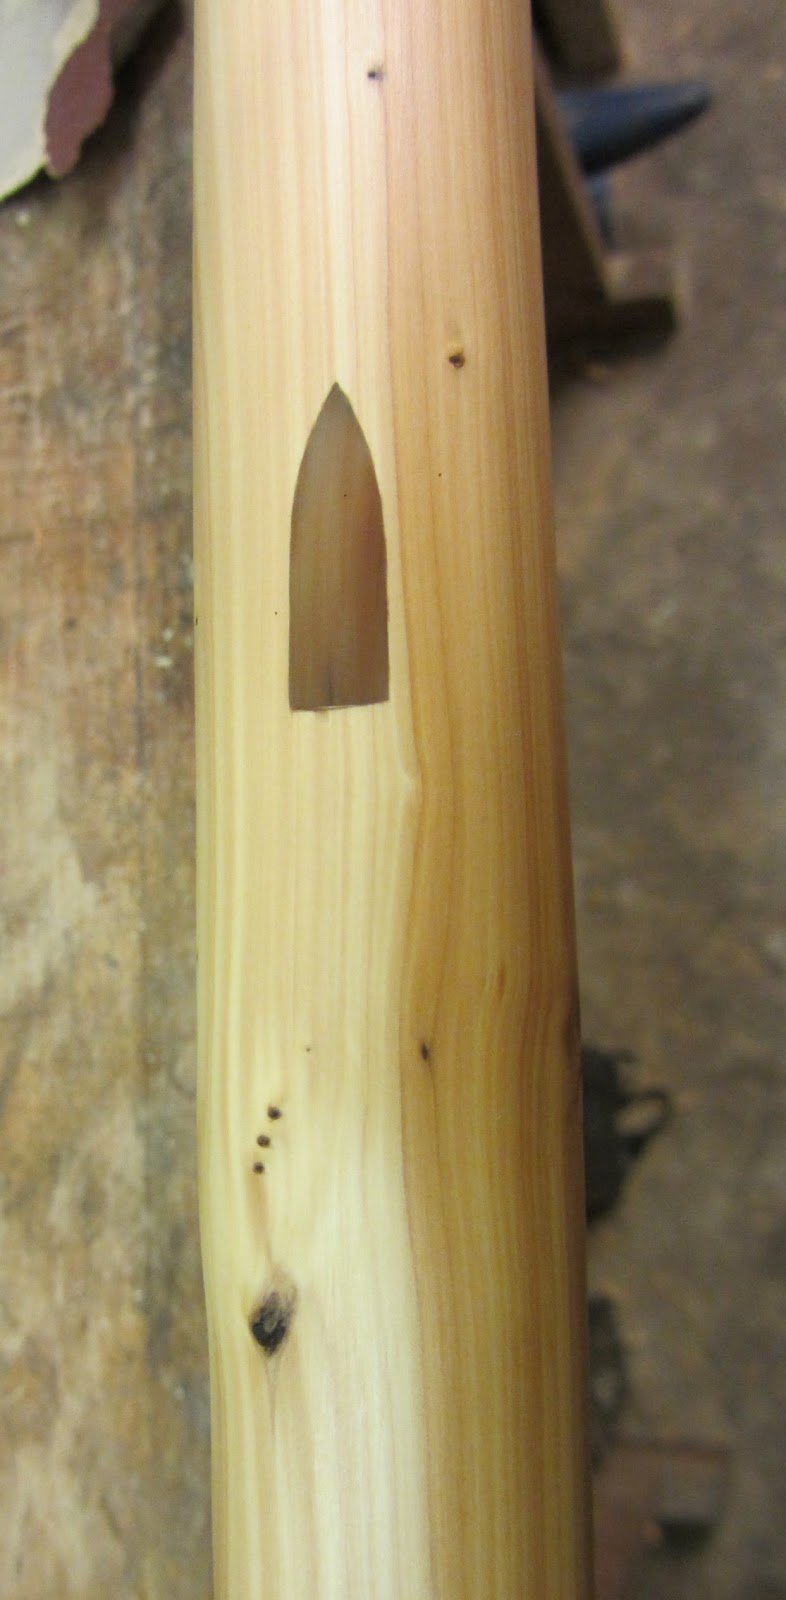 Got the arrow plate done this morning using an off-cut of the same horn that was used for the nocks.
It's good to have the arrow plate as the sapwood is quite deep at the grip and is a bit softer than the heartwood. If heavy arrows with whipping along the feathers are used it would rip into the sapwood.
Its more subtle than spectacular, it blends it nicely.
I went over the bow again with 80 and 120 grit Aluminium Oxide Paper (actual 'Sand' Paper is a waste of space). The first wipe of Danish oil showed a few remaining tool marks, but now it's smooth as silk and it's had another wipe of Danish Oil.
I'm sorting through my arrows and flight arrows to try it out tomorrow. I don't want to use any arrows over 30" long (unless they are marked with tape to show the maximum draw) so I'm making up a couple of quick basic flight arrows I'm using the stiffest spine 5/16" shafts I could buy, 70gn points turned to a sharper more aerodynamic point, plastic nocks and cut down flights. It will be interesting to see how it performs.
My mate JT is bringing the 130# Warbow over for me to examine and we'll try out a few bows. Must remember to take the Laser rangefinder... I'll go and put it out with my kit now... wait there.
Done it!
Thursday, 9 July 2015
Nearly Finished & Arrow Impact

 I got it back to 80# at 29" this morning which is certainly close enough. I've been sanding it down and got the first coat of Danish oil on it. I've shot a few arrows at a full 30" draw which was pretty impressive and hard work. I used my 3/8" 'pretend medieval' arrows. It banged 'em into the target very solidly.
I'll get the arrow plate done tomorrow and try it for distance on Saturday probably. Here are some pics.
 It's taken a little set, but bear in mind it started off with slight deflex on the lower limb and a huge deflex on the upper before steam bending, so I feel it's about right.
Top pic shows the overall view and the slight deflex on the upper limb (see also bottom pic). 2nd pic shows a nice pink blush on a knot near the grip and a little of the central pith showing.
The bottom nock looks good with a streak of brown in it. The sapwood is less clearly defined down by the lower nock.
I've been getting nicely into the bow, once I stopped clenching my teeth and gripping the bow so hard it became easier. Also breathing in and pushing out my bow hand gave me more draw and I could watch the arrow back to the 30" mark (a bit of masking tape on the shaft).
I decided that it would be good to video the arrow strike.
This should help put to rest the old question "Can an arrow knock over a knight in armour?", or "knock him off his horse?"
Now before people throw up their arms in protest... yes, I realise this is only an 80# bow and not a full weight arrow... BUT the target boss only weighs 10 pounds. (A bloke would weigh about 170 pounds and you could add maybe 50 for the armour.)
And yes I know it's a very unscientific test.
Now watch how far it is knocked back! Turn the sound up to maximise the thwackosity!
 The whole point is that some of the fast serves in tennis are faster than a warbow arrow and the ball is about two ounces (about half the weight of the heaviest arrows). But if we consider a cricket ball, its heavier than a war arrow. and isn't too much slower from the fastest bowlers.
You can play with the arithmetic and physics all you like, but the answer is still no!
Ok it my cause someone to fall over if they are off balance in the first place but it will be more due to the injury more than the physical impact. I could put something more solid in front of the target, but it would just make it harder to extract the arrow. If you don't like my test, pretend it's an un-armoured body not a knight... maybe a politican?
Note:- the piece of wood and foam in front of the target is to stop it toppling forwards and potentially breaking the arrow.
It's pointy!
That's why they didn't have tennis balls on the end of the arrows at Agincourt!
Wednesday, 8 July 2015
Near as Dammit!
I'd done some fiddling and fettling going over the belly with a cabinet scraper and blended in/narrowed the tips some more, which I was hoping had got it nearly back to 28"
I made a decent string last night and gave it a go this evening. (A great antidote to a day in front of a computer).
I warmed up on the spliced Yew, then my trust old 70 pounder.
Dunno if I got a full 28" draw and it was hard work but it gave the bow some exercise and stretched in the string, mind with AstroFlite it doesn't stretch much, the brace height only dropped about 1/4"
I'd only shot 3 arrows, but it's a wise man who knows when to quit.
I then got it on the scale and there it was 80# at 28".
Excellent!The last couple of inches of draw to reach 30" won't need much material removed as the bow will be setting in. It will mostly be shooting it in to get 100 arrows through it and fussing over it with the cabinet scraper and sanding it.
I've been chatting with my mate JT on E-mail who explodes a fair few warbows and it dawned on me that one problem may be that they are often not really shot in before being handed over.
He had one that lost a huge amount of draw weight and took some set, despite apearing to be perfectly tillered and superb wood... just shows you can't tell how a bow will perform.
I made him a 130# Yew bow a while back and he's slowly worked into it and is now back to a full 32". He's noticed a few little pinches at pin knots on the belly and he's going to bring it over for me to have a look.
Effectively he's taken a year to get it shot in and hopefully it's just slowly settled into full draw as indeed has he!
It begs the question what was the life of a warbow in medieval times? I won't be daft enough to even hazard a guess... there are plenty of 'armchair experts' to do that.
Mind they had a good supply of Yew and very experienced bowyers, still they must have had a few go bang at inopportune moments...
Maybe in battle the cry of "BOW" would bring a lad scurrying along the line with a replacement... who knows?
Monday, 6 July 2015
Nocks Done, Tiller Improved
 The picture speaks for itself really... the nocks aren't polished up yet. It's now at 80# @ 26 1/2" at a 6" brace. Back to work for a couple of day, should get it all the way back and shooting over next weekend, looking forward to trying at 30" with a flight arrow.
I'll just keep tidying it up, and easing off mid limb and tips to let the last few inches of draw slowly emerge.
I couldn't resist buffing up the top nock, it also shows the remnants of the filled knot which is a nice feature. The nock blends into the tip of the bow, and isn't too sharply pointed. I try to shape it to respect the original shape of the horn. The key is that it should be in keeping with the rest of the bow, neither too big nor too small, even the colour is harmonious. A big black horn nock shaped like a damn chess piece would spoil the subtlety of the whole thing.
At a practical level, a well blended nock allows the string to be slipped on easily. Next job is to make a string so I can fine tune the nocks to allows the string to sit nicely. At the moment I'm using my tillering string which has huge loops and is adjusted for length by threading it through the aluminium ring 1/3 of the way along the right side of the string.
Sunday, 5 July 2015
Back to 80# at 23"
 I got the pond finished yesterday, which was a fun way to spend a sunny day.
It's worked out well as its raining off and on today so I've been working on the bow.
The back has been gone over with a scraper and I've re- checked the string line and narrowed the limbs a bit more. The thickness has been checked along each limb, they've been thinned a good bit and the belly rounded.
The brace height has been increased to about 4 1/2" and it's pulling 80# at about 23".
(last post it was 19" from a 2" brace, so it's moved on a good bit)
 The tiller is looking a bit better each time I work on it.
The left (lower) limb is a bit stiff in the outer half, but the right is looking pretty good.
This poundage interpolates to about 110# at 30" so I've still got a fair amount to remove.
Removing wood to get the tiller right will move the draw length inexorably onwards. Once it's near 26-28" I'll put the horn nocks on.
Update:- 4pm. It's now back to 80# at just over 26" which interpolates to about 93# @30" so you see I'm getting closer. The tiller is much better now, the left is flexing more on the outer and the slightly stiff bit mid limb on the right is coming round.
It's taken a little set, but it had some deflex in the middle of each limb to start with, not to mention the big deflex on the upper limb.
Looking good. Might get the nocks on tomorrow.
Saturday, 4 July 2015
Bows, Ponds and Wood

 It was scorching hot yesterday and a man's fancy turns to messing about in the pond when having a break from the bow. One edge of the pond has old Oak fence posts lying flat along it with limestone boulders resting on them. One of the posts was a tad low to the water and had rotted away to almost nothing, the boulders were in danger of slumping into the water. Excellent fun standing upto my knees in the pod removing the boulders and old Oak post.
In the woods near me there are some fallen and felled trees, I thought two of 'em were Oak... nope, one was Willow, one was Ash, I couldn't tell from the bark and it was only when I'd sawed through I thought it didn't smell right for Oak and was a tad pale.
 I finally found a fallen Oak limb, a bit small and a bit rotten round the outside, but it will still last longer than Willow of Ash... mind the Willow would probably have sprouted! It's surprisingly dificult to identify a tree, the clue with the willow was that the two adjacent trees look like Oak until you looked high up into the canopy and saw the leaves, these where down near the stream. The other tree that had been felled was higher up in the woods ... no Willow there, adjacent trees were Oak, but there was a lot of Ash and Maple too. Just goes to show how tricky it is.
A big thunderstorm last night has raised the water level in the pond a good few inches and washed the remaining boulder into the pond.
Enough of my woodland/pond rambling, back to the bow.
 I filed stringer grooves in the tips and got it to a low brace (2") it was hard work getting that first brace. The bow is still way over weight, but the string line looked good and both limbs are flexing. I'm narrowing the tips a bit more and reducing the limbs more, measuring up for an even thickness taper and reducing/cleaning up the sapwood.
I don't s'pose there will be startling progress today (gotta go shopping... groan), I've just had it back on the tiller after some work and it's 80# @ 19" from the 2" brace.
I can take the brace height up a bit as I keep working at it.
I'm keeping the bow fairly wide for a warbow look, but it's being slowly narrowed a bit as I progress. One worrying knot on the corner of belly and side has all but disappeared and a loose knot very near one tip is being pegged... I'll try to avoid chopping my finger when I make the peg this time.
Maybe an update later, or at least some more pics tomorrow.
Friday, 3 July 2015
Steaming Ahead.

 I did a lot of work yesterday. It's funny how the rate of progress seems to increase as the stave comes down to a more manageable size. It's mostly because there is less bulk of wood to remove and it's also easier to see what's going on. That's not to say I rush at it, some people would probably find my progress frustratingly slow.
 The more I worked it, the more I realised the deflex at one end was downright ugly and being asymmetric would make the tillering tricky and bow would look odd. I thought about dry heat vs steam and opted for steam in the end. I got it done yesterday evening which gave it overnight to cool down and settle whilst still clamped up.(An hour would have done, but it's easy to mess with heat bent wood or glued wood too soon... better leave it overnight to prevent impatient fiddling!)
A good deal of care and preparation is required and even then things don't go to plan. I had about 2 1/2" of bend to take out, but I didn't want to go mad and overdo it as the other end has a slight deflex and I wanted it to match.
After half an hour of steam I could push the tip across with hand pressure, so I clamped it across and left it for another half hour (the steamer will run for about an hour before running out of water and switching itself off). I went back later to find the steam hose had come out and was lying on the floor.
Taking the clamp off, I could see I'd taken out about 1 1/2" of bend... not quite enough. So, having got it all set up it wasn't much trouble to put in some extra packing pieces to adjust it so that it could be clamped up with another inch of deflection. I gave it the full hour, and you can see the result in the final pic (the end that had the bend is at the top of the pic).
The whole episode is fairly typical of heat bending, it often takes a couple of goes, and it doesn't hurt to ease the bend in rather than trying to force a big correction in one go.

 I've taken an inch off the knottiest end and filed in some nock grooves for a long string. I put it on the tiller and heaved it back to 80#. It looks pretty good, it's certainly flexing. Some people wonder why I heave it to full target draw weigh straight away.
There's a full (but possibly boring) explanation here:-
http://bowyersdiary.blogspot.co.uk/2013/12/yew-stick-bow-and-draw-weight-to-brace.html
BTW:-
In the pic at the top of the page, you will see a round wooden disc on the floor to the left of the bench.
That's a "tuit"...
As I said,...
I'd do the bending when I got "a round to it"
(groan... sorry... having seen it in the pic I coudn't resist)
Thursday, 2 July 2015
Getting to Know the Yew Stave
 Funny stuff Yew.
I did a little work on de-barking and reducing the sapwood at the fair the other weekend. One kid asked why is it red? He was taking about the sapwood which shows the grow rings as alternating creamy and reddish pink. I gave him a full honest and expansive answer...
"I dunno. 'Cos it is!"

 The belly side of the stave is lovely crisp heartwood with the central pith of the log showing in places. It's always good to that in the centre of a stave , it's a good indicator that its laid out sensibly.
I've roughed it down to a fairly even layer of sapwood that's vaguely following a ring. I can get a better feel of the stave now and maybe mark it out further and reducing it with the draw knife.
One great improvement from working at the show is I've sharpened the drawknife.
 Its easy to forget a tool will loose it's edge especially on something tough like Elm or when used edge on as a giant scraper. I've been trying to improve the edge ever since I got it as there was a nick in centre of the blade. I have a really coarse blade on the belt sander at the moment, so I used that to make the bevel angle on the draw knife a bit more acute and to take more off the outer ends of the blade to help get it more even. It had been ground away a bit in the centre where the nick was. I didn't let the belt sander actually tough the cutting edge, that was sharpened using a variety of oil stones.
The stave is a couple of inches longer than I need, but I'm leaving it until I can see exactly where the bow lies. Even then I may leave it, as it's difficult to put it back on once its sawn off.
I'm well motivated with this bow as it will a good weight for me and I noticed the other day that the grass in the meadow on the flood plain has been cut so I'll be able to test it for distance with some flight arrows.
The final pic shows the end with the nicer sapwood nearest the camera. The deflex at the far end is clearly visible. I may take this out with heat once the bow starts to flex. It's much easier to tiller a bow that is symmetrical, mind a bit of deflex doesn't hurt.
Here are some pics. I should make some good progress over the next few days.
Subscribe to:
Comments (Atom)
